 It occurs to me that I somehow have not shown you the majestic costume I put together for Becky’s 5th grade Explorer Museum project. I say “put together” rather than “designed” because truthfully, she did all the research and all the designing. I just made the patterns and sewed the thing together.
Her school does this neat project where each kid picks an explorer and then does a whole living museum exhibit kind of thing (I think it would be even more cool if they did this with a group that wasn’t largely European dudes who were responsible for an awful lot of mass genocide and slavery but I digress). They put together reports and “artifacts” and journals, and then the parents show up and the kids all have to tell us about their explorers. It’s very involved.

Becky decided to be Ponce de León. I may have strongly suggested ol’ Ponce because I was under the misconception that he had the cool hat and 1/2 cape outfit. Not true. His hat is totally dumb, and no cape at all (okay, he’s wearing a cape in this picture, but in most renderings there’s no cape). I don’t know who I was thinking of, but it sure wasn’t Ponce de León. There’s a fairly ubiquitous rendering of the man wearing a chest plate with a fancy slash-sleeve shirt underneath. Several statues of him also show him wearing matching shorts. That Florida heat, I guess.
So we went to the fabric store and picked out a heavy blue-gray upholstery fabric for the tunic/armor, and yellow and red fabric for the sleeves. The kid’s a stickler for accuracy. We got home and I started planning this thing out, and I quickly realized that I had never done slash sleeves before. A quick whirl around Pinterest and I was all set with a nifty tutorial for Snow White sleeves.
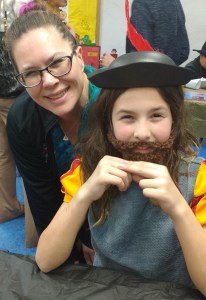
We had already decided that the sleeves would be connected to the “armor” rather than part of an undershirt, and after some discussion we decided to go with short sleeves rather than long. We rounded up a pair of plain black boots (her feet are almost as big as mine already!!!) and I whipped up a quick crocheted beard. I am super, super pleased at how it came out. But more importantly, Becky was really happy with it, which was the goal.
I give you: Juan Becky Ponce de León!

A couple more shots:

 I am! I had a bit of a crazy (but good!) week and then was sick all weekend. Bleh. But I’m back now, and I made a thing!
  fabric to make one ever since. So when I was buying the fabric for Becky’s amazing Ponce de Leon costume (more about that in a later post), I grabbed some jersey to make a couple.
 You know how sometimes you go to the fabric store for one thing (okay, so like ten things, but not all of them were for me, I swear) and while you’re there you find the perfect fabric for a project you didn’t even know you wanted to make? So that happened the other day and now I have a new sweatshirt wrap skirt.
 I picked out a pretty purple velvet button for the “visible” button (which no one will ever see because it’s not a really fitted skirt and also I kind of fucked up the waistband because I’m a lazy sewer and I knew no one would ever see it anyhow) and a flat mother of pearl button for the inside. Then I sat down at the machine and put the right foot on and adjusted all the settings and…nothing. I mean, not “nothing”, but no buttonhole, just a knot.
 So I bit the bullet and handsewed the damn buttonholes. I hate hand sewing. Hate it. But I have to say, doing buttonholes wasn’t nearly as bad as, say, hemming pants. And they’re not the prettiest thing I ever sewed, but I think they came out okay.


